Saturday, May 28, 2016

Handling Content-Type when connecting to Weblogic Message Queue through WSO2 ESB

Some of the Message broker's do not accept "-" in headers. Eg. Weblogic do not support Content-type parameter. Below is a solution to get rid of the issue, by
setting transport.jms.ContentTypeProperty in the jms URL and setting the value as below:

      
         JMSContentType
         application/xml


A sample proxy service to achieve this requirement is as below:

<?xml version="1.0" encoding="UTF-8"?>
<proxy xmlns="http://ws.apache.org/ns/synapse"
       name="WeblogicJMSSenderProxy"
       transports="http"
       statistics="disable"
       trace="disable"
       startOnLoad="true">
   <target>
      <inSequence>
         <property name="Accept-Encoding" scope="transport" action="remove"/>
         <property name="Content-Length" scope="transport" action="remove"/>
         <property name="Content-Type" scope="transport" action="remove"/>
         <property name="User-Agent" scope="transport" action="remove"/>
         <log level="custom">
            <property name="STATUS:"
                      value="------Message Sent by WeblogicJMSConsumerProxy--------"/>
         </log>
         <send>
            <endpoint>
               <address uri="jms:/jms/TestJMSQueue1?transport.jms.ConnectionFactoryJNDIName=jms/TestConnectionFactory1&java.naming.factory.initial=weblogic.jndi.WLInitialContextFactory&java.naming.provider.url=t3://localhost:7001&transport.jms.DestinationType=queue&transport.jms.ReplyDestination=jms/Queue2&transport.jms.ContentTypeProperty=JMSContentType"/>
            </endpoint>
         </send>
      </inSequence>
      <outSequence>
         <log level="custom">
            <property name="STATUS:"
                      value="------------------Out sequence invoked---------------------"/>
         </log>
         <log level="full"/>
         <log level="custom">
            <property name="STATUS:"
                      value="------------------Out sequence invoked - Before content type set ---------------------"/>
         </log>
         <send/>
      </outSequence>
   </target>
   <parameter name="transport.jms.ContentType">
      <rules>
         <jmsProperty>JMSContentType</jmsProperty>
         <default>application/xml</default>
      </rules>
   </parameter>
   <description/>
</proxy> 


Saturday, May 14, 2016

Avoiding Cipher Tool Password Prompt at WSO2 ESB Start up


When we use cipher tool for encrypting the configuration file passwords, whenever the ESB starts, it will prompt for the keystore password. This can be avoided by using password-tmp or password-persist files.

For temporary use, create a password-tmp file in ESB_HOME folder. This will be used only once at startup of the ESB and after starting the ESB, this file will be deleted.

For permanent use, create a password-persist file in ESB_HOME folder. This can be used lifetime.

Note: For windows the file name must be password-persist.txt andFor Linux the file name must be password-persist

References


Encrypting Configuration Password's in WSO2 ESB with Cipher Tool and Accessing using Custom Java Class

This article shows how to encrypt the configuration passwords in WSO2 ESB using Cipher tool and how to retrieve it using a custom java implementation.

Encryption using Cipher Tool ( ESB 4.8.1 )


1) Create the configuration xml. Here it is enc_test.xml and copy it to ESB_HOME/repository/conf.

ajanthan
batticaloa

2) Go to <esb_home>/repository/conf/security/cipher-tool.properties and add the below:
testenc.password=enc_test.xml//testenc/password,false
3) Go to <esb_home>/repository/conf/security/cipher-text.properties and take a backup of it and comment out all the other entries and add the below entry.
testenc.password=[batticaloa]
4) Execute the ciphertool.sh inside <esb_home>/bin

sh ciphertool.sh -Dconfigure
 
ajanthan@ajanthan-ThinkPad-T440p:~/wso2/blog/wso2esb-4.8.1/bin$ sh ciphertool.sh -Dconfigure
[Please Enter Primary KeyStore Password of Carbon Server : ]
Primary KeyStore of Carbon Server is initialized Successfully
Protected Token [testenc.password] is updated in enc_test.xml successfully
Encryption is done Successfully
Secret Configurations are written to the property file successfully

 5) You can see that in cipher-text.properties file that the record we entered as plain text is encrypted and the configuration file enc_test.xml will be converted with alias.

cipher-text.properties:
#Sun May 15 00:35:27 IST 2016
testenc.password=GF+b6kjk0e95DJh29rGEkGteOE/bjDoVPUxB1LU1SpEafNEPght5FqpinmR8ONO+
NHk4v9AFs+SX\nYbmpuAHmgLLXw9Gfj7SpdUIIF+iR087R8WwX/IzVJgLBfCUxfNb7b2UlH6MPtBMZX6o
2n+25XaPr\n2SCfhIptAXQNHrqxIHY\=
enc_test.xml:

ajanthan
password


Encryption using Cipher Tool ( ESB 4.9.0 )


1) Create the configuration xml. Here it is enc_test.xml and copy it to ESB_HOME/repository/conf.

ajanthan
batticaloa

2) Go to /repository/conf/security/cipher-tool.properties and comment all except the
Server.Service.Connector.keystorePass=repository/conf/tomcat/catalina-server.xml//Server/Service/Connector[@keystorePass],true
add the below:
testenc.password=repository/conf/enc_test.xml//testenc/password,false
3) Go to /repository/conf/security/cipher-text.properties and take a backup of it and comment out all the other entries escept
Server.Service.Connector.keystorePass=[wso2carbon]
and add the below entry.
testenc.password=[batticaloa]
4) Execute the ciphertool.sh inside /bin
sh ciphertool.sh -Dconfigure

ajanthan@ajanthan-ThinkPad-T440p:~/wso2/blog/wso2esb-4.9.0/bin$ sh ciphertool.sh -Dconfigure
[Please Enter Primary KeyStore Password of Carbon Server : ]
Primary KeyStore of Carbon Server is initialized Successfully
Protected Token [Server.Service.Connector.keystorePass] is updated in repository/conf/tomcat/catalina-server.xml successfully
Protected Token [testenc.password] is updated in repository/conf/enc_test.xml successfully
Encryption is done Successfully
Secret Configurations are written to the property file successfully

5) You can see that in cipher-text.properties file that the record we entered as plain text is encrypted and the configuration file enc_test.xml will be converted with alias.
#Sun May 15 01:18:51 IST 2016
Server.Service.Connector.keystorePass=A12Ui9TAcnZ4O51CyCwEnTCfRNkteE3oLr6Y
syHDud8faxeuCHl7Cr1HKEwIA44stUt64yhs4PoxS59v2tP/qoYNdjgnuXujXAjWfb9KcmhppH
jrUzPvyVmimM+lgVu+92qju19MUXk22KjA1MEJZ7c/n+ji5EpBSFgjSyrEgMM\=
testenc.password=HKudcxPNgNPhApsYJoHW47VLMeXxLy6oKgWwVMPZJ2IIw36BlUalTdsrd
lDW7Cw40kA7EivPKOJ+rKJ33R/SscVr4RreKXg5y5KqcN1i5swzzAy5gFMLq7z4trGG0B/
YlRIGWeeesUPpAg6tKGvZrsCjHGM1mlrqL1LtKeOk+os\=


ajanthan
password


Custom Java Class to Retrieve Encrypted Password


Below is a sample java class, which can be used retrieve the pass from the above encrypted enc_test.xml.
package com.custom.password.vault;

import java.io.File;
import java.io.FileInputStream;

import org.apache.axiom.om.OMElement;
import org.apache.axiom.om.impl.builder.StAXOMBuilder;
import org.apache.synapse.MessageContext;
import org.apache.synapse.mediators.AbstractMediator;
import org.wso2.carbon.utils.CarbonUtils;
import org.wso2.securevault.SecretResolver;
import org.wso2.securevault.SecretResolverFactory;

public class PasswordFromVault extends AbstractMediator {

 public boolean mediate(MessageContext context) {
  log.info("----------------PasswordFromVault Invoked---------------------");
  FileInputStream fileInputStream = null;
  String retrievePassword = null;
  String configurationPath = CarbonUtils.getCarbonHome() + File.separator
    + "repository" + File.separator + "conf" + File.separator
    + "enc_test.xml";
  File file = new File(configurationPath);
  if (file.exists()) {
   try {
    fileInputStream = new FileInputStream(file);
    StAXOMBuilder e = new StAXOMBuilder(fileInputStream);
    OMElement configElement = e.getDocumentElement();
    // Retrieve the password
    SecretResolver secretResolver = SecretResolverFactory.create(
      configElement, false);
    String secretAlias = "testenc.password";
    if (secretResolver != null && secretResolver.isInitialized()) {
     if (secretResolver.isTokenProtected(secretAlias)) {
      retrievePassword = secretResolver.resolve(secretAlias);
      log.info("Retrieve Password Inside Secret Resolver: " + retrievePassword );
     }
    }
   } catch (Exception e) {

   }
  }
  // Set Password to the context
  //context.setProperty("retrieved_password", retrievePassword);
        log.info("Retrieve Password: " + retrievePassword );
  return true;
 }

}

Test Results


[2016-05-15 02:07:24,429]  INFO - StartupFinalizerServiceComponent WSO2 Carbon started in 42 sec
[2016-05-15 02:07:24,644]  INFO - CarbonUIServiceComponent Mgt Console URL  : https://192.168.1.3:9443/carbon/
[2016-05-15 02:07:48,296]  INFO - LogMediator STATUS: = ------------Test Invoked------------------------------
[2016-05-15 02:07:48,296]  INFO - PasswordFromVault ----------------PasswordFromVault Invoked---------------------
[2016-05-15 02:07:48,298]  INFO - PasswordFromVault Retrieve Password Inside Secret Resolver: batticaloa
[2016-05-15 02:07:48,298]  INFO - PasswordFromVault Retrieve Password: batticaloa

Selecting between different JAVA jdk's in Ubuntu 14.04

This article shows how to install and select multiple version's of JAVA in Ubuntu 14.04. Before installing, first we need to know what are the available java and javac paths in Operating System. To find that run the below commands.
sudo update-alternatives --config java
sudo update-alternatives --config javac
To install a new java and javac paths, use the below commands.
sudo update-alternatives --install "/usr/bin/java" "javac" "/home/ajanthan/wso2/jdk1.8.0_91/bin/javac" 1
sudo update-alternatives --install "/usr/bin/java" "java" "/home/ajanthan/wso2/jdk1.8.0_91/bin/java" 1
To select a java and javac path currently available. Use the below commands and give the Selection No when prompted.
sudo update-alternatives --config java
sudo update-alternatives --config javac

Configuring WSO2 ESB with WebLogic Server Using JMS


This article gives the configuration details and the proxy service sample to connect the ESB as a JMS consumer and producer with WeblLogic Message Queue. Here the provided sample is tested with WSO2 ESB 4.9.0, WebLogic 12.1.3, JDK 1.8 and Ubuntu 14.04. At the end of this article mentioned about the other combinations of version, where this integration tested.

Setting up the WebLogic Server


Here used Weblogic 12.1.3. This can be downloaded from the below link.

Installation of Weblogic Server 12.1.3

 
After downloading the generic installer ( Installers with Oracle WebLogic Server and Oracle Coherence ) will get a jar named – fmw_12.1.3.0.0_wls.jar. Copy that to a specific folder and create another folder inside as weblogic_home to give it as a location for the installation during the installation step. Then using the terminal execute the below command.

java -jar fmw_12.1.3.0.0_wls.jar

Follow the screens, based on the instructions. The screen shots of each screen given below:


After the installation, if the configuration wizard not loaded, go to /weblogic_home/oracle_common/common and run the config.sh. Then will get the below screens and proceed with it.


 After completing the configuration, now can start the WebLogic Server 12.1.3.

Go to /home/ajanthan/wso2/weblogic_server5/weblogic_home/user_projects/domains/base_domain and start using startWebLogic.sh.

After a successful start the terminal will be look as below:


 Configuring Message Queue in WebLogic


Go to the URL http://ajanthan-thinkpad-t440p:7001/console


Follow the below steps to create the JMSServer, ConnectionFactory and Message Queue in WebLogic server.

Go to Domain Structure → base_domain → Services → Messaging → JMS Servers
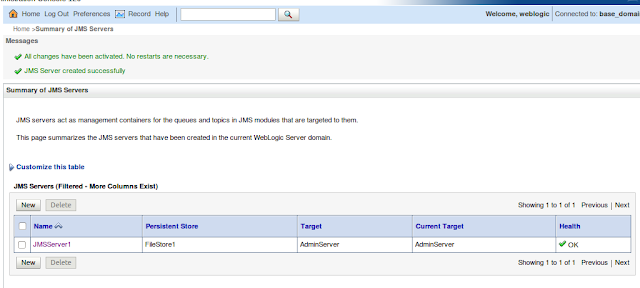
Create New JMSServer.


Create a New Store and set a folder for file store location. Here it is filestorewso2 and then proceed with the below screens.


Now to configure JMS Queue and the Connection Factory, 
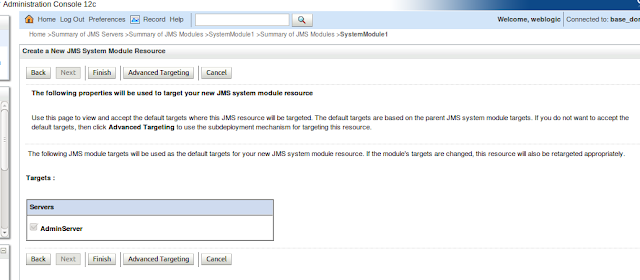
Go to Domain Structure → base_domain → Services → Messaging → JMS Modules and create a new module and follow the screens below.


Then Select the created JMS Module, here it is SystemModule1 and select the tab Subdeployments.Then follow the below screens.


Select the Module created ( SystemModule1 ) and follow the screens to create the connection factory.


Same way create the queue. Follow the screens as below:


That's it, the WebLogic based configurations done.

Configuring WSO2 ESB 4.9.0


As a first step, need to create the client jar of WebLogic server to support the WSO2 ESB.

Go to /home/ajanthan/wso2/weblogic_server5/weblogic_home/wlserver/server/lib
and run the below command.

java -jar wljarbuilder.jar

This will create a wlfullclient.jar inside the same location. Now need to remove the javax.jms package and javax.xml.namespace package from the wlfullclient.jar.
For this you can follow two options.

1)  Use the pom.xml in the https://docs.wso2.com/display/ESB490/Configure+with+WebLogic and build the bundle and copied it to ESB_HOME/repository/components/dropins.

2) Open the wlfullclient.jar using Archive Manager and remove the folders of the below packages manually. 
javax.jms
javax.xml.namespace
And copy the jar to ESB_HOME/repository/components/lib.

JMS Listener configuration in axis2.xml


<transportReceiver name="jms" class="org.apache.axis2.transport.jms.JMSListener">
        <parameter name="myQueueConnectionFactory" locked="false">
        <parameter name="java.naming.factory.initial" locked="false">weblogic.jndi.WLInitialContextFactory</parameter>
        <parameter name="java.naming.provider.url" locked="false">t3://localhost:7001</parameter>
        <parameter name="transport.jms.ConnectionFactoryJNDIName" locked="false">jms/TestConnectionFactory1</parameter>
        <parameter name="transport.jms.ConnectionFactoryType" locked="false">queue</parameter>
        <parameter name="transport.jms.UserName" locked="false">weblogic</parameter>
        <parameter name="transport.jms.Password" locked="false">Batticaloa@1A</parameter>
        </parameter>

        <parameter name="default" locked="false">
        <parameter name="java.naming.factory.initial" locked="false">weblogic.jndi.WLInitialContextFactory</parameter>
        <parameter name="java.naming.provider.url" locked="false">t3://localhost:7001</parameter>
        <parameter name="transport.jms.ConnectionFactoryJNDIName" locked="false">jms/TestConnectionFactory1</parameter>
        <parameter name="transport.jms.ConnectionFactoryType" locked="false">queue</parameter>
        <parameter name="transport.jms.UserName" locked="false">weblogic</parameter>
        <parameter name="transport.jms.Password" locked="false">Batticaloa@1A</parameter>
        </parameter>
</transportReceiver>

JMS Sender configuration


<transportSender name="jms" class="org.apache.axis2.transport.jms.JMSSender"/>

Consumer Proxy Service

<?xml version="1.0" encoding="UTF-8"?>
<proxy xmlns="http://ws.apache.org/ns/synapse"
       name="WeblogicJMSConsumerProxy"
       transports="jms"
       statistics="disable"
       trace="disable"
       startOnLoad="true">
   <target>
      <inSequence>
         <log level="custom">
            <property name="STATUS:"
                      value="------Message consumed by WeblogicJMSConsumerProxy--------"/>
         </log>
         <log level="full"/>
      </inSequence>
      <outSequence>
         <send/>
      </outSequence>
   </target>
   <parameter name="transport.jms.Destination">jms/TestJMSQueue1</parameter>
   <description/>
</proxy>

Producer Proxy Service

<?xml version="1.0" encoding="UTF-8"?>
<proxy xmlns="http://ws.apache.org/ns/synapse"
       name="WeblogicJMSSenderProxy"
       transports="http"
       statistics="disable"
       trace="disable"
       startOnLoad="true">
   <target>
      <inSequence>
         <property name="Accept-Encoding" scope="transport" action="remove"/>
         <property name="Content-Length" scope="transport" action="remove"/>
         <property name="Content-Type" scope="transport" action="remove"/>
         <property name="User-Agent" scope="transport" action="remove"/>
         <log level="custom">
            <property name="STATUS:"
                      value="------Message Sent by WeblogicJMSConsumerProxy--------"/>
         </log>
         <property name="OUT_ONLY" value="true"/>
         <property name="FORCE_SC_ACCEPTED" value="true" scope="axis2"/>
         <send>
            <endpoint>
               <address uri="jms:/jms/TestJMSQueue1?transport.jms.ConnectionFactoryJNDIName=jms/TestConnectionFactory1&java.naming.factory.initial=weblogic.jndi.WLInitialContextFactory&java.naming.provider.url=t3://localhost:7001&transport.jms.DestinationType=queue"/>
            </endpoint>
         </send>
      </inSequence>
      <outSequence>
         <send/>
      </outSequence>
   </target>
   <description/>
</proxy>

Test Results

Tested Environment Combinations


1) ESB 4.7.0 / JDK1.7 / Weblogic 10.3.6 - Weblogic 11g.
2) ESB 4.9.0 / JDK1.7 / Weblogic 10.3.6 - Weblogic 11g.
3) ESB 4.9.0 / JDK1.8 / Weblogic 12.1.3

References


[1] https://docs.wso2.com/display/ESB490/Configure+with+WebLogic
[2] https://blogs.oracle.com/soaproactive/entry/how_to_create_a_simple
[3] http://lasanthatechlog.blogspot.com/2013/06/integrating-wso2-esb-with-weblogic-as.html
[4] https://docs.oracle.com/cd/E12840_01/wls/docs103/client/jarbuilder.html